POS: Deleting Pre-Auth Payments
Pre-Auth Deletion can be performed for SPPAX and MPPG payments.
Back Office
Navigation: Login to BO, and for your Store select Settings > Application > General Settings
On the General Settings page:
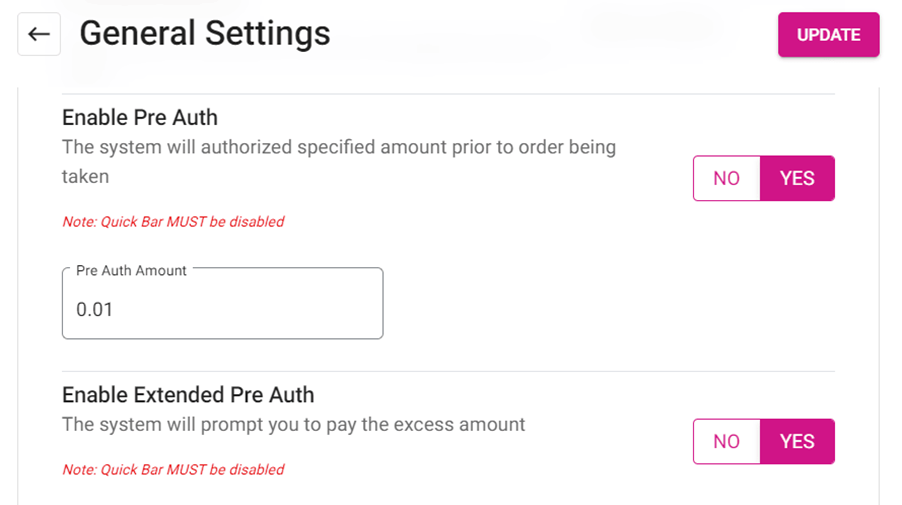
- When Enable Pre Auth toggle is enabled (set to YES), the Pre Auth Amount field will appear and you can enter the Amount to appear in POS.
- The system will allow authorizing the specific Amount prior to the Order, and the Pre auth Amount will be specified in POS.
Implementation in POS
Selecting Pre-Auth Payment
- If Enable Pre Auth toggle is enabled in BO, the system will allow authorizing the specific Amount prior to the Order, and the Pre auth Amount will be specified in POS.
- Enter the Pre Auth Amount and the currency will be as per the Store's Settings.
- Under Hardware Settings, select the pre auth payment method from dropdown (SPPAX or MPPG) in Card Reader tab.
- Pre auth payment selection and device connection must be completed in Hardware Settings.
- Under Hardware Settings, select Pre auth from the dropdown and the corresponding device will be connected.
- If MPPG is selected in Pre auth, then MPPG device will be connected.
- If SPPAX device is selected in Pre auth, then SPPAX device will be connected.
- On the POS screen: upon clicking BAR - TAB as the service type, the SPPAX or MPPG Pre auth field will appear.
- The Pre Auth Amount established in BO will appear in the Currency value based on the Store's Settings.
- Note: The minimum Pre Auth value must be 0.01.
- Select the Number field, and the number pad will appear for entering a different Pre Auth Amount.
- When ready, select Process. The Pre Auth amount will be processed through the selected SPPAX or MPPG device.
- Once the Pre Auth process is completed, a pop-up with the message 'Your card [Masked card number] is Authorized' appears for MPPG payment.
- Press Exit, and the page will navigate to the Order screen.
Completing Pre-Auth Payment
- Place the Order, then click on Payment to complete payment.
- On the Payment screen: select the Pre Auth payment then select Delete. The payment will be deleted.
- When attempting to delete pre auth payments, the payment device must be connected to POS.
- If the device is not connected while performing deletion, then ‘Unable to connect device’ error message appears.
- Once the Pre Auth payment is deleted, you can select other Payment Methods to complete payment on the Order.
- When extended pre auth is enabled in BO and the Check Amount exceeds the pre auth amount, the system will request to perform extended pre auth.
- When the Check amount is less than or equal to the pre auth amount, the sale will be completed without requesting additional pre auth.
- When the Menu Item value is more than the set pre auth amount, A pop up should be shown – “The check amount exceeded the pre auth amount. Do you want to pre auth additional amount” with Yes or no button.
- If Yes is selected, the Pre-auth box appears. This amount can be customized by entering the exact value of the amount exceeded or above than the check value but should not be less than the check value. Once user clicks on process, Extended pre auth amount will be processed.
- If No is selected, the extended pre auth will be cancelled.
Pre Auth Amounts and Other Payments
- When the Process option is selected on the extended pre auth screen with the existing pre auth amount or less than that, then a pop-up with the message 'Amount should be greater than existing pre auth amount' appears (the previous pre auth amount will also appear).
- The successfully made pre auth payment will appear on the Payment screen.
- Select the Extended Pre Auth payment then click on Delete. The Extended Pre Auth payment will be deleted.
- When the Extended Pre Auth payment is deleted then Submit is clicked, the page will navigate to Signature pad and the Payment page will reappear.
- When attempting to Submit while the existing pre auth amount is not equal to the total payment: a pop-up with the error message ‘Please pay $(balance amount)’ will appear.
- When attempting to select another payment method for balance amount, a pop-up with the error message 'Please delete the pre-auth to process the new card or just click submit to close the payment' appears.
- You can delete all pre auth payments and select other payment methods to complete the payment.
Related Articles
POS: Deleting Pre-Auth Payments
Pre-Auth Deletion can be performed for SPPAX and MPPG payments. Back Office Navigation: Login to BO, and for your Store select Settings > Application > General Settings On the General Settings page: When Enable Pre Auth toggle is enabled (set to ...POS: SPPAX Payments
Back Office (BO) BO Admin Requirements Navigation: Log into BO then select Admin > Stores Under Admin Store(s): When enabling the SPPAX toggle (setting to Yes), the SPPAX Details screen appears. Enter the mandatory details (pax device serial number) ...POS: Factor 4 Payments
Factor 4 is a Gift Card and a Loyalty Program provider. They empower businesses of all sizes to identify and monetize Customer Loyalty. This article describes the process of integrating Factor 4. Changes in the Back Office (BO) Navigation: Log into ...POS: Partial Payments in Online Ordering (OLO)
Introduction This article explains partial payments with all payment options (Credit Card / Loyalty Points / Gift Card / Cash) for Online Ordering. Background The Customer can make partial payment using any of the payment options. The toggle Enable ...POS: GiveX Payments
Back Office Super Admin Navigation: Log in to the Back Office Admin page, then select Accounts > Store Details The GiveX Gift Card toggle must be Enabled (set to YES) on the Super Admin page. Upon enabling this toggle, the GiveX Gift Card can be ...