Back Office: User Management - Tip Adjustment
Sign into the Back Office.
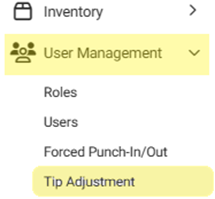
On the left–side Navigation Panel, click User Management then Tip Adjustment. The Tip Adjustment page appears.
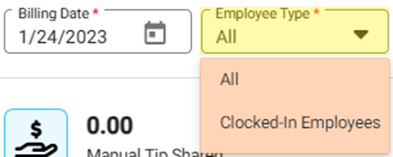
Select the Billing Date and Employee Type, then click Apply.
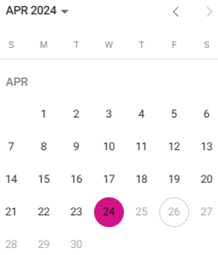
Billing Date Filter – Select the Billing Date (calendar view).
Employee Type Filter – Select the Employee Type from the dropdown.
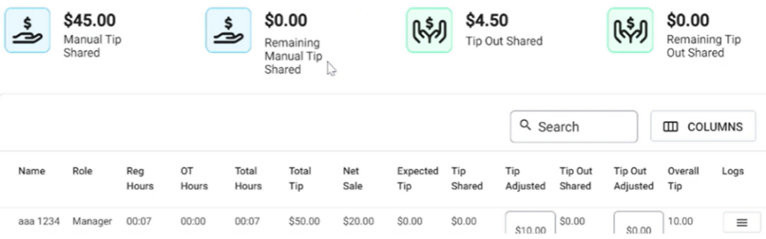
After clicking Apply the header tile values will be updated – as well as employee data appearing as rows in the table.
Manual Tip Shared - Manual tip shared for the list of employees.
Remaining Manual Tip Shared - The remaining manual tip after sharing with employees.
Tip Out Shared - The shared tip out for the employees.
Remaining Tip Out Shared - The remaining shared tip out after sharing with employees.
If no Tip Adjustments occurred based on the Billing Date and Employee Type selections, the header values all appear as 0.00 and the message ‘Tip Adjustment not found’ appears in the table.
The following columns make up the Tip Adjustment table, based on the Billing Date:
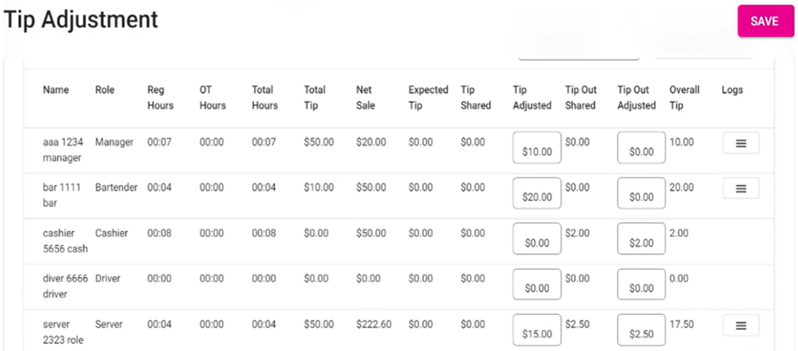
Name – The employee’s name.
Role – The employee’s role.
Reg Hours – The amount of Regular hours worked by the employee.
OT Hours – The amount of Overtime hours worked by the employee.
Total Hours – The sum of Regular hours and Overtime hours.
Total Tip – The Net Tip generated by the employee.
Net Sale – The Net Sales made by the employee.
Expected Tip – The amount of Expected Tip for the employee.
Manual Tip Sharing – Two sub columns will be shown – Shared / Adjusted & This field can be edited only with numbers.
Shared – The manual tip shared among employees.
Adjusted – The manual tip adjusted for the employee.
Tip Out – Contains two sub-columns for Shared and Adjusted
Shared – The shared tip out for the employee will be shown.
Adjusted – The adjusted tip out will be shown , it cannot be edited.
Overall Tip – The sum of all the tips will be shown.
Logs – Upon clicking it a new window appears with the following details:
Date – The date of the Tip adjustment [DD–MMM–YYYY, HH:MM PM/AM format].
Adjust By – The ID of the Employee who performed the adjustment.
Tip Before Adjust – The manual tip value.
Tip After Adjust – The adjusted tip for the employee.
Tip Out Before Adjust – The tip out shared for the value by default will be shown.
Tip out After adjust – The adjusted tip out for the employee will be shown.
Click Close to close the Logs window and return to the Tip Adjustment screen.
Saving – The Save button will be disabled, unless any changes are made to the Manual Tip Sharing Adjusted or Tip Out Adjusted columns.
Related Articles
Back Office: User Role Management
Sign into the Back Office and select a Store. On the left-side Navigation Panel, click User Management then select Roles. On the Roles page, click + New Role at the top-right. The New Role pane appears. You can update a Role by clicking the ...
Employee Tip Adjustment
Sign into the Back Office. On the left–side Navigation Panel, click User Management then Tip Adjustment. The Tip Adjustment page appears. Select the Billing Date and Employee Type, then click Apply. Billing Date Filter – Select the Billing Date ...
POS: Operation - Till Management
Navigation: Log in to POS, then select Operations > Till Management Till is the money trays that fit into the Cash Drawers. They help Owners and Managers to keep track of the Cash that passes through their business daily. When ordering from the Order ...
POS: Operation - Till Management (Till Tab)
The Till tab displays the following sub-tabs: Set Till Active Till Held Till Closed Till Set Till Set Till Setting a Till is entering the amount to Till starts with. Select Set Till, and the Open Till window appears. Enter the Denomination and Tip ...
Back Office: User Management - Resetting a User's Password
Sign into the Back Office and select a Store. On the left-side Navigation Panel, click User Management then Users. On the Users screen, under the Actions column click the corresponding three dots (•••) for a User then click Reset Password. The Reset ...